Sharepoint Online for Law Firms

Background Story :

Law firms and legal departments keep carrying their banners of heavy document consumers. To follow a paperless business approach, legal professionals invest actively in content and document management solutions. According to Statista, by 2019 legal departments will substantially increase their spending in various document-centric domains. They will invest at least $349 million in contract management (+185% comparing to 2015), $183 million in document management (+44%) and $279 million in matter management (+43%). They will also spend 50% more on collaboration tools and 94% more on legal project management solutions.

Solution:

Here as below the point-point why we choose SharePoint Online to answer what their needed and most common case in Document Management System :

  1. Introduction to SharePoint

Microsoft SharePoint is part of Microsoft 365 (formerly known as Office 365). SharePoint is most commonly referred to as a content management system, as it’s a secure place to store all company documents and content for easy access. It’s also commonly used for creating company intranets.

You can also use SharePoint to create workflows to automate processes within your firm. Some companies use the solution to build apps teams can use to collaborate, share content, and access company info.

To access SharePoint, you and your team can use any browser or the SharePoint app. The mobile app is a great way to access firm information while on the go. SharePoint enables you to create folders (and sub-folders), called Libraries, similar to other file storage tools. This is a great way to organize firm information

SharePoint is a common tool for sharing central folders, files, apps, and information across an organization. It’s a great tool for basic cloud storage.

2. What Is Basic Cloud Storage?

There are effectively 2 types of cloud storage are Basic cloud storage, and Document management systems (DMS).

Basic cloud storage acts like an online filing cabinet, essentially. It’s a place to store and access firm documents and files quickly from anywhere. Other examples of basic cloud storage include Dropbox, OneDrive, and Google Drive.

For some law firms, simple storage isn’t enough. Firms often require features such as version tracking, email management, compliance help, file profiling, and more to truly manage their documents. This is where a DMS comes in.

3. The Difference Between SharePoint and OneDrive

SharePoint and OneDrive are similar, but separate and often used in conjunction with one another as part of an overarching Microsoft 365 Plan. For many law firms:

  • SharePoint holds the firm’s central, shared documents that should be accessible to the entire firm (subject to permissions, of course), and:
  • OneDrive serves as each individual law firm team-members personal/individual storage.

SharePoint includes additional features you won’t find in OneDrive. For example, SharePoint features collaborative documents and offers a shared assets library for your firm. In contrast, OneDrive offers features SharePoint doesn’t, too, such as the ability to comment inside documents.

4. Benefits of SharePoint for Law Firms

SharePoint can deliver several benefits to your law firm. For example, it enables simplified collaboration for your team and is scalable to meet your needs. When used in conjunction with Microsoft 365, it’s the gateway to the other critical tools that make up your tech stack, including OneDrive, Word, PowerPoint, and more.

  • Streamline business processes by offering team members a centralized location for all files, documents, and firm information.
  • Share critical law firm communications to your entire team quickly and efficiently.
  • Enable seamless collaboration for all projects, from in-depth cases to day-to-day work by using SharePoint with other Microsoft 365 tools

5. SharePoint Features

  • Microsoft 365 integration: As part of Microsoft 365, SharePoint integrates seamlessly with your other favorite 365 products. For example, you can share documents from OneDrive or use real-time chat inside SharePoint with Microsoft Teams. Plus, connecting all of your apps is as simple as a few clicks.
  • Enhanced security: Microsoft encrypts your data while at rest and in transit. SSL/TLS connections and 2048-bit keys are used for the encryption of data in transit. At rest, Microsoft uses BitLocker disk-level encryption and per-file encryption. In other words, the data you share inside SharePoint is secure.
  • Real-time collaboration: Your legal team can collaborate on documents and files in real-time, streamlining your work. For example, you and your paralegal can make changes to client documents at the same time.
  • Simplified access to documents and files: Instead of searching through multiple tools for documents and files, your entire team can find everything they need for their work inside SharePoint. Plus, with SharePoint’s customization options, you organize your documents and files in the way that makes the most sense for your firm.
  • Mobile functionality: Your team should have access to important law firm content from anywhere. SharePoint is also available inside a mobile app (for iOS and Android) for on-the-go access. Or, you can access SharePoint via your favorite browser on any laptop or tablet. All you need is the URL for your SharePoint site.

6. Demo

Portal Legal Management Team with custom webpart show the Recent Documents, News, And Also Documents Already Expired that need it to do more actions.

Sample Document libabray that can created multiple folders and customize permission base on Folder.

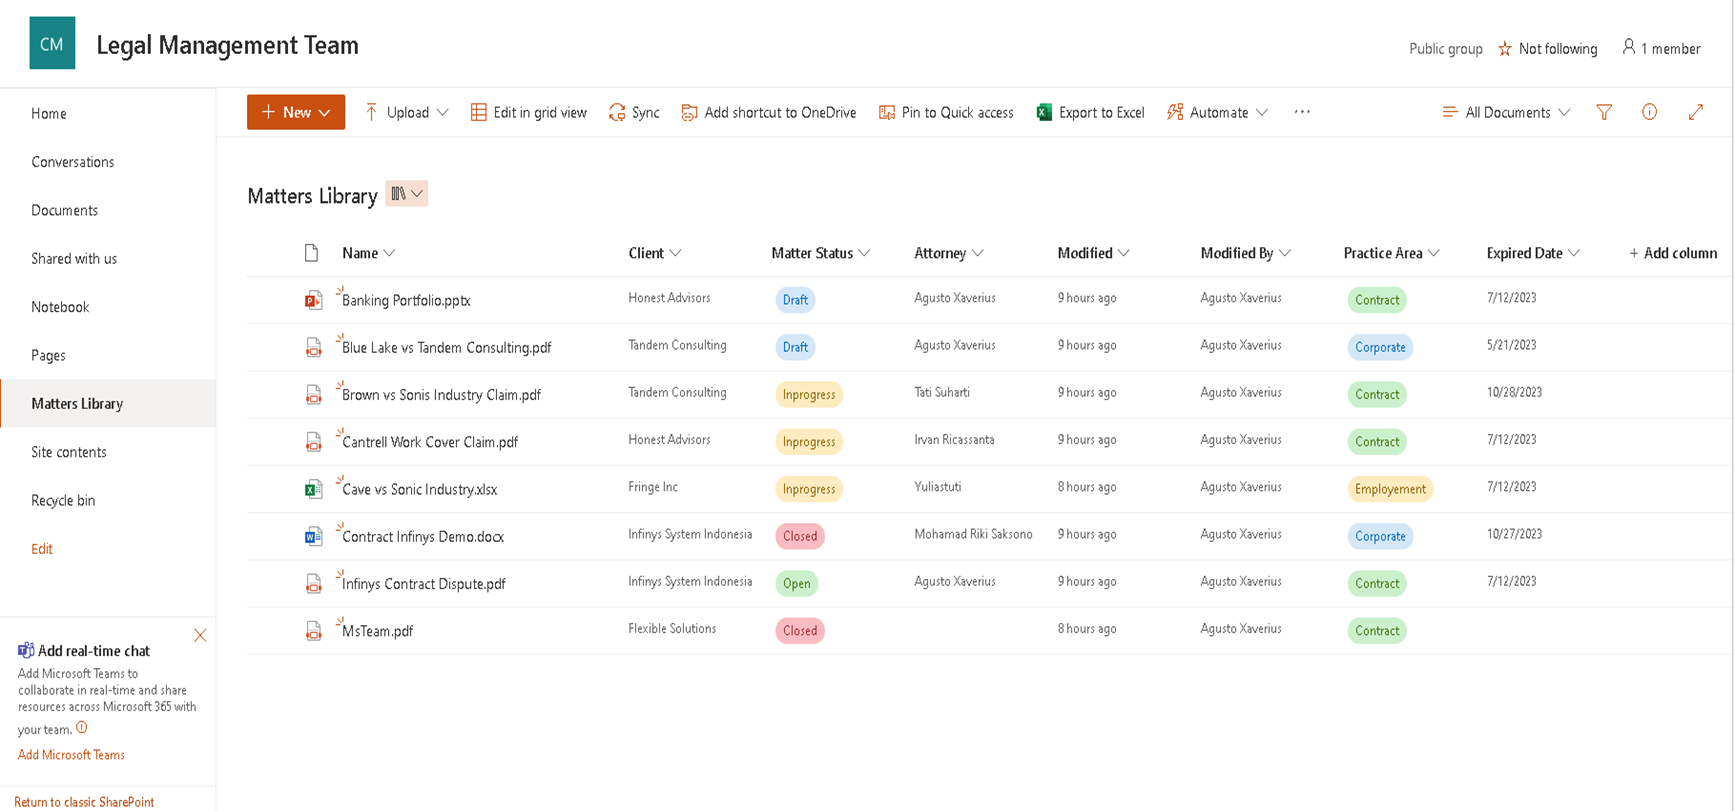
Sample Demo 2, instead we are using folder to categories the documents. We are created custom metadata like Client, Matter Status, Attorney, Practice Area, and also Expiered Date

And for field Expired data as well we did automation like send an email to spesific email when Matter Status is Closed and etc.

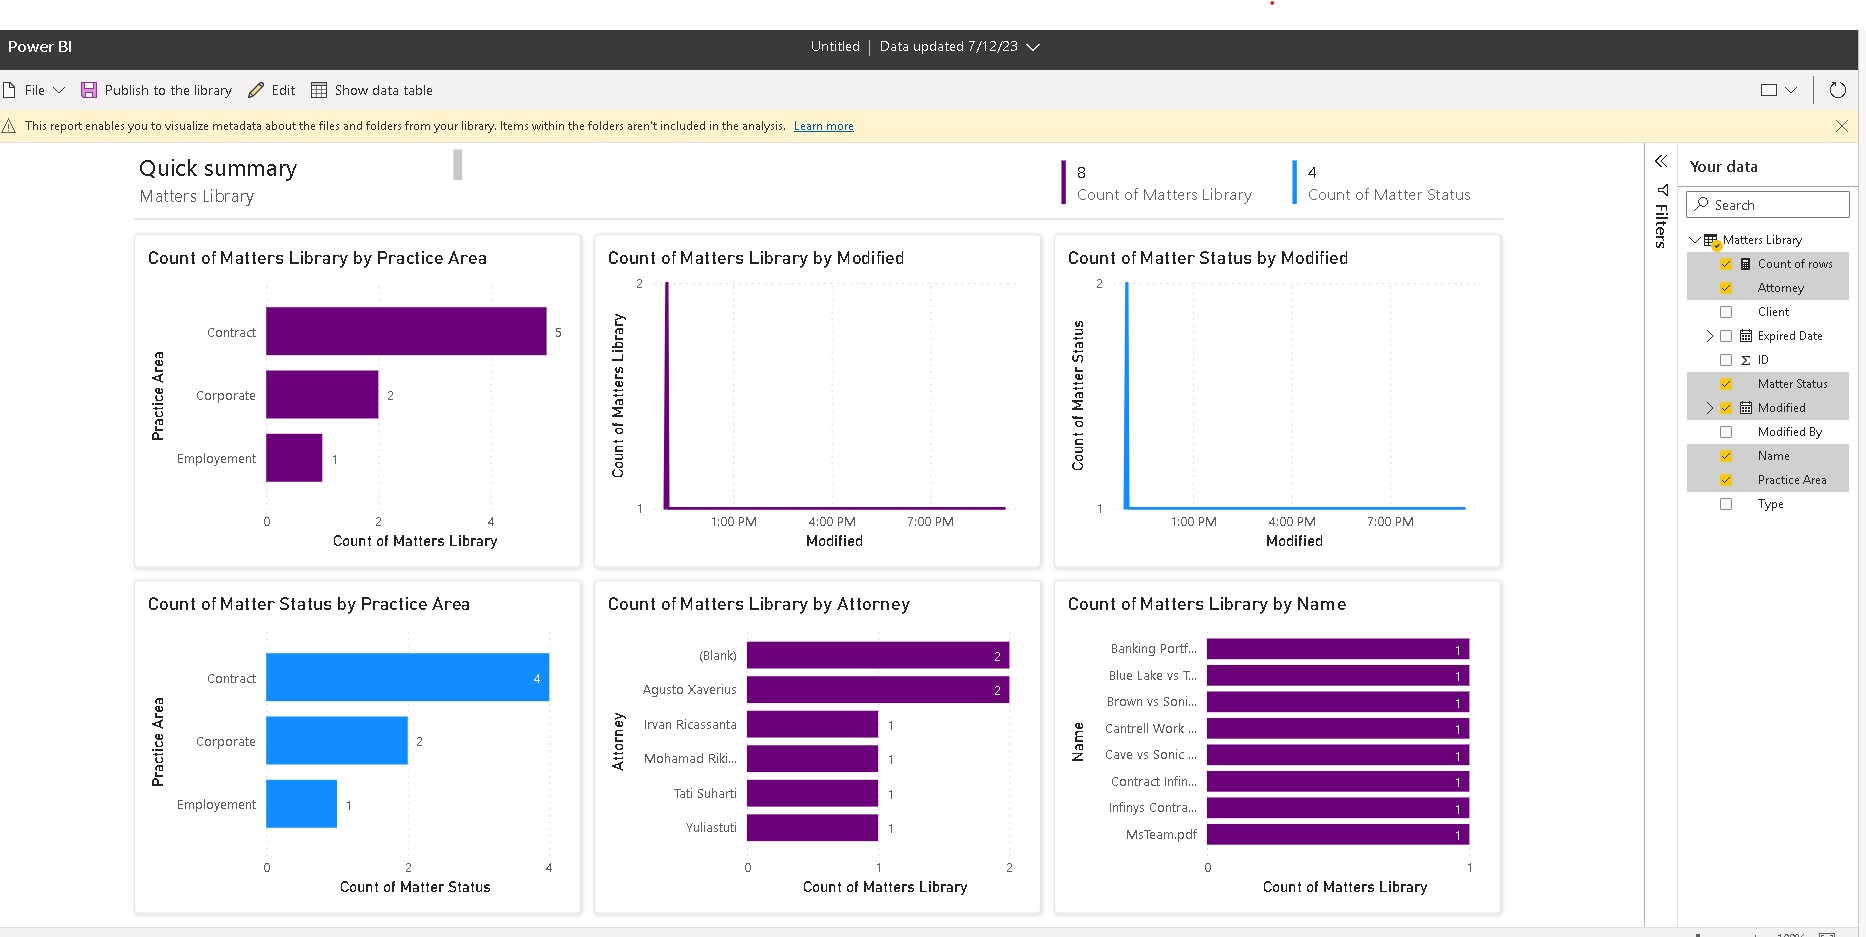
Integration with Matters Library and Power BI for Visualize the Reporting. Nice Rights 🙂

Happy SharePoint-ing,

If your company need me to present this solution you can direct contact me or https://www.infinyscloud.com/

Ensure claims-based authentication is used for all web applications and zones of a SharePoint 2019 farm

Claims-based authentication enables systems and applications to authenticate a user
without requiring the user to disclose more personal information than necessary.
SharePoint continues to offer support for both claims and classic authentication modes.
Claims-based identity is an identity model in SharePoint that includes features such as
authentication across users of Windows-based systems and systems that are not Windows-
based, multiple authentication types, stronger real-time authentication, a wider set of
principal types, and delegation of user identity between applications.

When a user signs in to SharePoint, the user’s token is validated and then used to sign in to
SharePoint. The user’s token is a security token issued by a claims provider. When you
build claims-aware applications, the user presents an identity to the application as a set of
claims. One claim could be the user’s name, another might be an email address. The
external identity system is configured to give your application all the information that it
needs about the user with each request, along with cryptographic assurance that the
identity data received by the application comes from a trusted source.

Solution

  1. Navigate to Central Administration website.
  2. Under Application Management go to Manage web applications.
  3. Click on the site you’re planning to verify Claims Based Authentication.
  4. Under Web Applications tab click on the Authentication Providers icon.
  5. Under the small window pop-up verify if the default value is set to Windows.
  6. Create a PowerShell (.ps1) file and paste the following code into it:

$setcba = Get-SPWebApplication ‘http://’
$setcba.UseClaimsAuthentication = 1;
$setcba.Update()

  1. Save the Code as SetClaimsBasedAuthentication.ps1 on the SharePoint server.
  2. Execute the PowerShell script from the SharePoint Management Shell using the
    following command ./SetClaimsBasedAuthentication.ps1

Copy Files Between Document Libraries in SharePoint using PowerShell

Add-PSSnapin Microsoft.SharePoint.PowerShell -ErrorAction SilentlyContinue

#Custom Function to Copy Files from Source Folder to Target

Function Copy-Files($SourceFolder$TargetFolder)

{

    write-host "Copying Files from:$($SourceFolder.URL) to $($TargetFolder.URL)"

    #Get Each File from the Source

    $SourceFilesColl $SourceFolder.Files

    #Iterate through each item from the source

    Foreach($SourceFile in $SourceFilesColl)

    {

        #Copy File from the Source

        $NewFile $TargetFolder.Files.Add($SourceFile.Name, $SourceFile.OpenBinary(),$True)

        #Copy Meta-Data from Source

        Foreach($Field in $SourceFile.Item.Fields)

        {

            If(!$Field.ReadOnlyField)

            {

                if($NewFile.Item.Fields.ContainsField($Field.InternalName))

                {

                    $NewFile.Item[$Field.InternalName] = $SourceFile.Item[$Field.InternalName]

                }

            }

        }

        #Update

        $NewFile.Item.UpdateOverwriteVersion()

        Write-host "Copied File:"$SourceFile.Name

    }

    #Process SubFolders

    Foreach($SubFolder in $SourceFolder.SubFolders)

    {

        if($SubFolder.Name -ne "Forms")

        {

            #Check if Sub-Folder exists in the Target Library!

            $NewTargetFolder $TargetFolder.ParentWeb.GetFolder($SubFolder.Name)

            if ($NewTargetFolder.Exists -eq $false)

            {

                #Create a Folder

                $NewTargetFolder $TargetFolder.SubFolders.Add($SubFolder.Name)

            }

            #Call the function recursively

            Copy-Files $SubFolder $NewTargetFolder

        }

    }

}

#Variables for Processing

$WebURL="https://portal.crescent.com/sites/sales/"

$SourceLibrary ="Team Docs"

$TargetLibrary "Sales Documents"

#Get Objects

$Web Get-SPWeb $WebURL

$SourceFolder $Web.GetFolder($SourceLibrary)

$TargetFolder $Web.GetFolder($TargetLibrary)

#Call the Function to Copy All Files

Copy-Files $SourceFolder $TargetFolder

#Read more: https://www.sharepointdiary.com/2016/03/copy-files-between-document-libraries-using-powershell-in-sharepoint.html#ixzz7ZRavYgS1

Configure User Profile Service Application and My Site in SharePoint 2019

A. Create User Profile Sync for Active Directory for User AD Syncronization

Example the user account is spSyncConn

  1. Create a user on your Active Directory for User AD Syncronication, let say spSyncConn
  2. The synchronization account must have Replicate Directory Changes permissions at the root of the forest.

B. Configure Synchronization Connections

  • Open Central Admin
  • Click Application Management
  • Navigate to Manage Service Application >> User Profile Service Application
  • Uder Synchronization >> click Configure Synchronization Connection
  • On the Synchronization Connection page >> click on Create New connection

Fill the fields with your environment and/or business needs

  • Click button Populate Container to List all the structure of yor active directory
  • Checked all those that you want to sync it or click all to syncronize all
  • Then Click button OK to save the configuration

C. Create MySite Host

  • Open Central Adminstration
  • Click Create site Collection
  • Fill in up all the information and choose My Site Host as template

  • Fill in the Primary Site Collection Administrator and Secondary as well
  • Choose quota template
  • Click button OK to save the configuration

D. Create My Site Managed Path

We will need to create a Managed Path for the My Site. Let’s use the path “/sites/MySite/Personal” for this purpose. If it is not created already, we can create it going to the Central Administration ->Manage Web Applications -> Managed Paths

In the new Managed Path creation page, add the intended Managed path(“/sites/MySite/Personal”). Specify the type as Wildcard Inclusion and click on OK.

D. Configure My Site

  •  User Profile Service Application from Application Management -> Manage Service Applications .
  • It will open up the User Profile Service Application page. From there, select ‘Setup My Sites’.
  • In the My Site Host section, specify the Site Collection URL for the My Site Host we had created earlier.
  • Under Personal Site Location, specify the Managed Path for the My Site that we had created earlier.

E. Configure Self Service Site Creation

So, one added benefit of My Site is that it enables users to create Site Collections from the My Site Page. We can enable it from Manage Web Applications -> Self Service Site Creation.

Done.

Happy Sharepoint-ing

How to make Absence Attendance mobile apps with feature GPS location in 2 days – Power Apps

There are 2 version languages available for this article.

Indonesia Version :

Ignite 2021 ini, saya tertarik dengan salah satu presentasi dan demo mengenai Power Apps.

Demo dari perusahaan itu dan ide mereka dimana membuat aplikasi-aplikasi kecil dalam membantu digitilasi dan automisasi perusahaan. Pada saat itu mereka juga menjelaskan berapa antusiasnya para user-user mereka menggunakan aplikasi itu dan mulai mengembangkan aplikasi-aplikasi lainnya untuk kebutuhan lainnya.

Dari situ saya berpikir, wah saya juga ingin mencoba membuatnya dan berpikir bahwa aplikasi yang cepat siap saji, cepat dalam development dan implementasi itu akan mempercepat produktifitas perusahaan itu sendiri.

Kebetulan saya juga akan membawakan webinar untuk tanggal 25 Maret 2021 mengenai “Leverage your Work from Home Level Now” maka mencoba membuatkan aplikasi menggunakan Power Apps tersebut, dengan data berita perusahan saya ambil dari internal Sharepoint Online dan penyimpanan data absen itu menggunakan excel file yang di taruh di onedrive microsoft office 365.

Berikut requirementnya:

Sebagai HRD dan Company

  • Applikasi yang mudah dibuat, tidak perlu ribet development dan implementasi
  • Dapat dengan mudah melakukan rekap Absen karena menggunakan Excel File
  • Bisa sharing kegiatan-kegiatan perusahan yang bisa dibaca oleh Karyawan
  • Aman, hanya bisa diakses oleh karyawan
  • Dapat memberikan Posisi (GPS) dimana karyawan berada. Itu dapat membantu bila ada informasi terkait Covid 19 di wilayah tersebut

Sebagi User / Employee

  • Dapat diakses mudah dan aman
  • UI yang simple dan informatif
  • Karyawan bisa mudah melihat history absen yang sudah di submit.
  • Karyawan bisa mengetahui berita seputar perusahaan.

Okay 🙂 Setelah requirement diatas maka mari kita persiapkan dan buat aplikasinya :

  1. Siapkan data source Events untuk berita-berita perusahan. Disini kita cukup menggunakan list dengan tipe calendar

2. Siapkan data source Excel, yang nantinya data absen akan disimpan kesana

Sheet1

Sheet 2, master data pada drop down menu nantinya.

3. Mari buat dengan Power Apps setelah point 1 dan 2 diatas sudah kita siapkan

Total screen yang akan kita buat adalah 6 (enam), yaitu :

  • Home Screen

Submit Attendance Click ini akan Navigate(EditAttendanceScreen,ScreenTransition.None)

My Attendance List ini akan Navigate(MyAttendanceScreen, ScreenTransition.Fade)

Company News ini akan Navigate(NewsListScreen, ScreenTransition.Fade)

  • NewsListScreen

  • MyAttendanceScreen
  • DetailAttendanceScreen
  • EditAttendanceScreen

Power Apps form sudah selesai, maka siap di publish dan share ke user-user yang di organisasi anda yang akan menggunakan aplikasi ini.

—————————————

English Version :

Past month ago, there was a Microsoft Event Ignite 2021. I was interested with one presentation and demo about the Power Apps.

That demo was about from one of company at Indonesia. They are have briliant idea to build small and simple application – application for their company to help the compay on digitalisation and automitation process. At that presentation, the speaker was also explained how enthusiastic their employee to use the application and began to develop other applications for other needed.

After that presentation i was thought, wow i am also want to try to build the application like that. The application with fast to serve, fast in to development and also implementation it will accelarate the productivity of the company itself.

25 March 2021, i am also have a webinar with title “Leverage your Work from Home Level Now” and i am also as speaker there. For that event, i tried to make an application on top Power Apps. With company news data that I take from internal Sharepoint Online and store the absent data using excel file that is placed on OneDrive Microsoft Office 365.

Here are the requirement detail as follow :

As Human Resources Department and Company

  • The application has to be simple. Easy to development and Implementation
  • Easy to do absense recap, because it using Excel Files.
  • Able to share company events to employee
  • Safe and Secure and only able to access by its employee.
  • Can provide Position (GPS) where employees are located. That can help if there is information related to Covid 19 in the area

As Employee

  • Application it is easy to used and secure
  • User Interface simpel and informatif
  • Employee with ease to see their absence history was submitted
  • Employee can read information about event around company.

Okay 🙂 Regarding the requirement above then we can prepare and start to build the application :

  1. Prepare the Events data source for company news. Here we just need to use a list with a calendar type

2. Prepare the Excel data source, which later the timesheet will be saved there

Sheet 1

Sheet 2

3. Let’s cook it after point 1 and 2 above we have prepared

The total screen that we will create is 6 (six), namely:

  • EditAttendanceScreen

All complete, so it’s ready to publish and share with users in your organization who will use this application.

Happy Sharepoint-ing

Setup Power Apps Integration with Sharepoint Server On-Premise (Infopath replacement)

InfoPath as we know it will no longer be used in next version of Sharepoint Server. In fact, since several years ago, Microsoft has announced this. But until now in version of Sharepoint 2019, Infopath service is still remain but with no longer any improvement features at all in Infopath.

Infopath itself is one of the best tools from Microsoft Sharepoint that has long been used by Sharepoint Developers to be able to make applications easier, faster and very user friendly in an interface.

Now Microsoft offers a new Technology that is Power Apps. Similar with Infopath, Power Apps also help users to design their application easily, quickly and user friendly. But it is not limited to Sharepoint or SQL Server data sources only, but can access other data sources as well like One Drive, Google Drive, Drop Box, and many more

Power Apps is a Cloud Centrix Application, where the application is in Microsoft Cloud, and until this article was published Power Apps cannot be installed on On Premises Environment.

Powers Apps can also intergrated with our Microsoft Sharepoint On Premises atau SQL Server On Premises.

Here are the steps for integrating Microsoft Sharepoint 2019 On Premise with Power Apps.

  1. Register an Power Apps account at https://make.powerapps.com
  2. Download Power Apps Studio and Power Apps On-Premises Data gateway
This image has an empty alt attribute; its file name is image-4.png

3. Install On-Premises Data Gateway on our Server Sharepoint 2019 On Premise

The steps are as follows:

  • Type your email addrress that you was registered at Power Apps portal.
  • Register a new gateway on this computer
  • Type Gateway Name, and Recovery Key
  • The gateway result configration we can see on Power Apps Portal.

3. Create a new SharePoint Connector and Connect to Gateway that we have been created.

  • Choose Connect Using on-premises data gateway dan type Username and Password is needed,
x 
SharePoint 
Microsoft 
SharePoint helps organizations share and collaborate with colleagues, partners, 
and customers. You can connect to SharePoint Online or to an on-premises 
SharePoint 2013 or 2016 farm using the On-Premises Data Gateway to manage 
documents and list items. 
How do you want to connect to your data? 
C) Connect directly (cloud-services) 
@Connect using on-premises data gateway O 
Authentication Type 
Windows 
Username 
Cancel 
Create
SharePoint 
Microsoft 
Windows 
Username 
Password * 
Choose a gateway 
Agusto 
If you don't see a gateway, or want a new one, you can install one 
*hic lic. 
Cancel 
x 
CD

4. Installation are done!!! 🙂 yippe. Now we able to use it on Power Apps to create our application

In Indonesia Version

InfoPath seperti yang kita ketahui tidak akan digunakan lagi di versi Sharepoint Server berikutnya.

Padahal, sejak beberapa tahun lalu, Microsoft sudah menyinggung hal ini. Namun hingga saat ini di versi Sharepoint 2019, layanan Infopath masih tetap ada namun tidak ada lagi peningkatan/pembaharuan fitur sama sekali di Infopath.

Infopath itu sendiri adalah salah satu tools terbaik dari Microsoft Sharepoint yang sudah lama dipakai oleh para Developer Sharepoint untuk bisa membuat aplikasi lebih mudah, cepat dan sangat user friendly secara interface.

Sekarang Microsoft menawarkan technology baru yaitu Power Apps. Sama dengan Infopath, Power Apps juga membantu user untuk mendesign aplikasi mereka dengan mudah, cepat dan user friendly. Tetapi tidak dibatasi hanya dengan data sources Sharepoint atau SQL Server saja, tetapi bisa mengakses datasource lainnya seperti One Drive, Google Drive, Drop Box, dll.

Power Apps ini juga adalah bagian dari Power Platform yang pernah saya jelaskan di article saya sebelumnya https://agustox21.wordpress.com/2021/01/20/microsoft-power-platform

Power Apps ini adalah aplikasi Cloud Centrix, dimana aplikasi ada di Microsoft Cloud dan sampai saat artikel ini dibuat Power Apps tidak bisa diinstall di On Premise Environment.

Power Apps juga bisa diintergrasikan dengan Microsoft Sharepoint 2019 On Premise atau SQL Server On Premise kita.

Berikut adalah langkah-langkah mengintergrasikan Microsoft Sharepoint 2019 On Premise dengan Power Apps.

  1. Membuat Akun Power Apps di https://make.powerapps.com/
  2. Download Power Apps Studio dan Power Apps On-Premises Data gateway

3. Install On-Premises Data Gateway di Server Mesin Sharepoint 2019 On Premise

Langkah-langkah sebagai berikut :

  • Masukkan alamat email Akun Power Apps / Azure yang ada
  • Register a new gateway on this computer
  • Masukkan Gateway Name, dan Key
  • Hasil gateway tersebut bisa kita lihat di Power Apps Portal

3. Buat Connector SharePoint dan Connect ke Gateway yang sudah kita buat

  • Plih Connect Using on-premises data gateway dan masukkan Username dan Password yang dibutuhkan
x 
SharePoint 
Microsoft 
SharePoint helps organizations share and collaborate with colleagues, partners, 
and customers. You can connect to SharePoint Online or to an on-premises 
SharePoint 2013 or 2016 farm using the On-Premises Data Gateway to manage 
documents and list items. 
How do you want to connect to your data? 
C) Connect directly (cloud-services) 
@Connect using on-premises data gateway O 
Authentication Type 
Windows 
Username 
Cancel 
Create
SharePoint 
Microsoft 
Windows 
Username 
Password * 
Choose a gateway 
Agusto 
If you don't see a gateway, or want a new one, you can install one 
*hic lic. 
Cancel 
x 
CD

4. Installasi sudah selesai dan kita sudah bisa menggunkan Power Apps untuk aplikasi yang kita inginkan.

Happy Sharepoint-Ing

Settings to control sharing at the organization level in SharePoint and OneDrive Office 365

Collaborating with partners and clients external to your organization is bread and butter of many businesses. With our continued investments in external collaboration, SharePoint, OneDrive, and Teams is the hub for your external collaboration teamwork. Check the links above for details.

Happy Sharepoint-ing

Power Automate, Try Catch Block

When i was on develop Request Money workflow using Power Automate. You can read on this link : https://agustox21.wordpress.com/2020/07/17/solution-show-caserequest-money-goods-approval-using-office-365-power-apps-and-ms-automate/.

I was have a problem where there is data that sometimes appears and sometime not and i have to get the value for that.

At that time, i am struggle on data result from block Get Items to Sharepoint List on Power Automate. If field Manager or Manager 2 has value, then we can get the value from each of field. But if not, the data it will not shown so it is need to double check it because it will error if using the same function to get the value

I tried to find the validation script for that but until now still not find yet and then i found that Power Automate has block function about Try Catch then i decided to use it

Try, Catch, Finally blocks in the above template are nothing but scope controls


Here below is the use of scope in my Power Automate :

Try – The “Try” scope should contain all the actions from the main flow of the process.


Catch – The “Catch” scope is configured to run after “Try” block is failed. This is implemented using “Configure run after ” feature .

image-15

image-16

Convert HTML String To PDF Via iText Library And Download

I decided post this code in this blog for my reference later if i go back again as Developer 🙂 This Project was a Sharepoint 2016 Project and still used web form asp.net application.

  1. Code the ascx (Usercontrol)

When the user is directed to this page, the user control automatically creates some html data regarding the information sent. Then after information are done, if you check on javascript code below, #btnprint triger to click and that button and execute javascript function PrintElem.

The PrintElem function is to collect the HTML code (see on the var printContents) then transfer to control txtPrint. After are done then call server side function btnExportToPdf_Click (__doPostBack(‘<%=btnExportToPdf.UniqueID%>’, ”);)

2. Reference library

HtmlAgilityPack and iText 7, you can download it from manage nuget on your visual studio.

3. Code

protected void btnExportToPdf_Click(object sender, EventArgs e)
{
StringBuilder contents = new StringBuilder(txtPrint.Text);
string mFilePath = string.Empty;

        //fungsi di bawah hanya untuk mendapatkan jumlah page
        using (MemoryStream ms = new MemoryStream())
        {
            HtmlDocument hDocument = new HtmlDocument
            {
                OptionWriteEmptyNodes = true,
                OptionAutoCloseOnEnd = true,
            };

            hDocument.LoadHtml(contents.ToString());
            var closedTags = hDocument.DocumentNode.WriteTo();

            FontProgram fontProgram = FontProgramFactory.CreateFont(@"C:\Windows\Fonts\calibri.ttf");
            PdfFont calibri = PdfFontFactory.CreateFont(fontProgram, PdfEncodings.WINANSI);

            iText.Kernel.Pdf.PdfWriter pdfWriter = new PdfWriter(ms);
            PdfDocument pdfDocument = new PdfDocument(pdfWriter);
            pdfDocument.AddFont(calibri);

            iText.Kernel.Pdf.PdfDocument pdfDoc = new iText.Kernel.Pdf.PdfDocument(pdfWriter);
            pdfDoc.SetDefaultPageSize(iText.Kernel.Geom.PageSize.A4);

            HeadertFooterHandler handler = new HeadertFooterHandler();
            pdfDoc.AddEventHandler(PdfDocumentEvent.START_PAGE, handler);
            handler.setInfo(DocNo);

            using (Document document = new Document(pdfDoc))
            {
                /*document.SetMargins(10, 10, 10, 10);*/
                document.SetMargins(0, 0, 0, 0);
                document.SetFont(calibri);
                document.SetFontSize(8);
                document.SetWordSpacing(0);

                using (var htmlMemoryStream = new MemoryStream(System.Text.Encoding.UTF8.GetBytes(closedTags.ToString())))
                {
                    /* KB : https://itextpdf.com/en/resources/books/itext-7-converting-html-pdf-pdfhtml/chapter-6-using-fonts-pdfhtml */

                    ConverterProperties properties = new ConverterProperties();
                    properties.SetFontProvider(new iText.Html2pdf.Resolver.Font.DefaultFontProvider(true, true, true));

                    HtmlConverter.ConvertToPdf(htmlMemoryStream, pdfDoc, properties);
                }
            }

            //byte[] mByte = ms.ToArray();

            //TR_AFA_HEADERS afa = AfaHeader;
            //mFilePath = string.Format("{0}/{1}/{2}/AFA_{3}_Print.pdf", SPContext.Current.Web.Url, afa.DocumentLibraryType, afa.AfaHeaderID, afa.Afa_Header_Id);

            //bool sts = Utils.SP_UploadDocument(SPContext.Current.Web.Url, mFilePath, mByte, afa.Afa_Number, afa.Afa_Purpose);

            contents = null;

            pdfDoc.Close();
            pdfWriter.Close();
            ms.Close();
        }

        using (MemoryStream ms = new MemoryStream())
        {
            HtmlDocument hDocument = new HtmlDocument
            {
                OptionWriteEmptyNodes = true,
                OptionAutoCloseOnEnd = true,
            };

            hDocument.LoadHtml(contents.ToString());
            var closedTags = hDocument.DocumentNode.WriteTo();

            FontProgram fontProgram = FontProgramFactory.CreateFont(@"C:\Windows\Fonts\calibri.ttf");
            PdfFont calibri = PdfFontFactory.CreateFont(fontProgram, PdfEncodings.WINANSI);

            iText.Kernel.Pdf.PdfWriter pdfWriter = new PdfWriter(ms);
            PdfDocument pdfDocument = new PdfDocument(pdfWriter);
            pdfDocument.AddFont(calibri);

            iText.Kernel.Pdf.PdfDocument pdfDoc = new iText.Kernel.Pdf.PdfDocument(pdfWriter);
            pdfDoc.SetDefaultPageSize(iText.Kernel.Geom.PageSize.A4);

            HeadertFooterHandler handler = new HeadertFooterHandler();
            pdfDoc.AddEventHandler(PdfDocumentEvent.START_PAGE, handler);
            handler.setInfo(DocNo);

            using (Document document = new Document(pdfDoc))
            {
                /*document.SetMargins(10, 10, 10, 10);*/
                document.SetMargins(0, 0, 0, 0);
                document.SetFont(calibri);
                document.SetFontSize(8);
                document.SetWordSpacing(0);

                using (var htmlMemoryStream = new MemoryStream(System.Text.Encoding.UTF8.GetBytes(closedTags.ToString())))
                {
                    /* KB : https://itextpdf.com/en/resources/books/itext-7-converting-html-pdf-pdfhtml/chapter-6-using-fonts-pdfhtml */

                    ConverterProperties properties = new ConverterProperties();
                    properties.SetFontProvider(new iText.Html2pdf.Resolver.Font.DefaultFontProvider(true, true, true));

                    HtmlConverter.ConvertToPdf(htmlMemoryStream, pdfDoc, properties);
                }
            }

            byte[] mByte = ms.ToArray();

            TR_AFA_HEADERS afa = AfaHeader;
            mFilePath = string.Format("{0}/{1}/{2}/AFA_{3}_Print.pdf", SPContext.Current.Web.Url, afa.DocumentLibraryType, afa.AfaHeaderID, afa.Afa_Header_Id);

            bool sts = Utils.SP_UploadDocument(SPContext.Current.Web.Url, mFilePath, mByte, afa.Afa_Number, afa.Afa_Purpose);

            contents = null;

            pdfDoc.Close();
            pdfWriter.Close();
            ms.Close();
        }
        loading_screen.Attributes.Add("style", "display:none");
        Response.Redirect(mFilePath);
    }


}

public class HeadertFooterHandler : IEventHandler
{
    String info;
    public void setInfo(String info)
    {
        this.info = info;
    }
    public String getInfo()
    {
        return info;
    }

    public void HandleEvent(Event @event)
    {
        iText.Kernel.Colors.Color colorGray = new DeviceRgb(128, 128, 128);

        PdfDocumentEvent docEvent = (PdfDocumentEvent)@event;
        PdfPage page = docEvent.GetPage();
        int pageNum = docEvent.GetDocument().GetPageNumber(page);

        iText.Kernel.Geom.Rectangle pageSize = page.GetPageSize();
        PdfDocument pdfDoc = ((PdfDocumentEvent)@event).GetDocument();

        PdfCanvas pdfCanvas = new PdfCanvas(page.NewContentStreamBefore(), page.GetResources(), pdfDoc);

        new Canvas(pdfCanvas, pdfDoc, pageSize)
         //header
         .SetFontSize(4)
         .SetOpacity(2)
         .SetFontColor(colorGray)
         .ShowTextAligned(info, 10, pageSize.GetTop() - 20, TextAlignment.LEFT, VerticalAlignment.MIDDLE, 0)
         .ShowTextAligned(string.Format("{0:dd MMM yyyy HH:mm:ss}", DateTime.Now), 10, 30, TextAlignment.LEFT, VerticalAlignment.MIDDLE, 0)
         .ShowTextAligned(string.Format("Page {0} of {1}",pageNum.ToString(), docEvent.GetDocument().GetNumberOfPages()), pageSize.GetWidth() - 60, 30, TextAlignment.RIGHT, VerticalAlignment.MIDDLE, 0);
    }
}

Sample screenshot

Happy Sharepoint-ing